This post may contain affiliate links. Please read our disclosure policy.
These Peppermint Candy Cane Cookies are the ultimate Christmas treat. Peppermint flavored sugar cookies twisted into the cutest candy cane shapes, finished with a festive sparkle of sugar. They take a little more effort than your average cookie, but trust me, the payoff is worth every minute.
I’ve made these cookies so many times over the years, and every batch brings the same feeling of pride (and a tiny bit of perfectionist madness) as the one before it. They are crisp on the edges, soft in the center, full of peppermint flavor, and hands-down some of the best Christmas cookies you’ll ever bake.

Table of Contents
Why You’ll Love These Candy Cane Cookies
Peppermint Candy Cane Cookies are some of the best Christmas cookies I’ve ever made. They require a little more work than your typical roll and cut sugar cookie and are definitely not as easy to make as a quick five minute fudge, but I guarantee that these peppermint cookies will be loved by all.
- Festive and fun: Perfect for holiday parties or Christmas cookie trays. If you love peppermint holiday treats, you might also be interested in my Homemade Peppermint Patties and Peppermint Bark Recipe.
- Incredible flavor: A blend of peppermint and vanilla gives the perfect holiday taste.
- Kid-friendly: Letting the kids help twist and shape the dough is part of the fun—even if it tests my control-freak tendencies.
- Worth the effort: These cookies are a labor of love, and they absolutely show it.
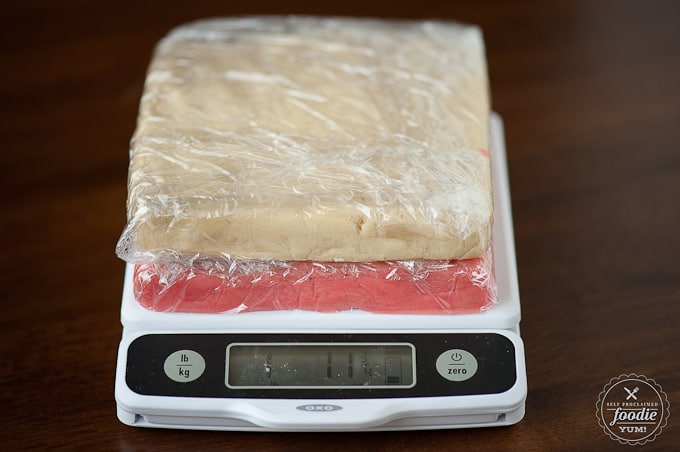
I may or may not weigh the dough to make sure the red and white halves are exactly the same. (Okay, I definitely do.) You don’t have to be that crazy, but if you are, you’re in good company.
Ingredients That Make Them So Good
- Butter: Softened and whipped until light and fluffy.
- Sugars: A mix of granulated and powdered sugar gives just the right tender texture.
- Extracts: Both peppermint and vanilla for that classic holiday flavor.
- Red food coloring: For that perfect candy cane stripe.
- Decorating sugar: Adds the perfect sparkle and crunch.
Exact quantities are listed below in the recipe card. Note: the recipe card allows you to easily scale the recipe and will automatically adjust the ingredient quantities.
How to Make Peppermint Candy Cane Cookies
Always refer to the recipe card below, but here’s a simple outline:
1. Make the Dough
Beat the butter until fluffy, then add the sugars and beat again until even lighter. Add egg yolks and flavorings, then slowly mix in the flour and salt.
Pro Tip: Don’t overmix. Once the flour disappears, you’re done.
2. Divide and Color
Split the dough into two equal parts. I like to weigh them to be precise. Tint half of the dough red, keeping the other half plain.
Wrap each portion and flatten into squares. Chill for at least 2 hours (or overnight if you’re planning ahead).
3. Roll, Stack, and Slice
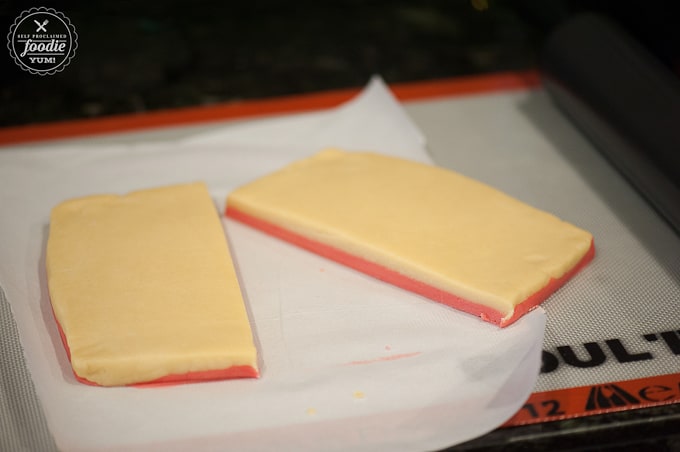
Roll out both doughs into 9×9-inch squares. Stack, press together, and cut down the middle. Chill again to make slicing easier.
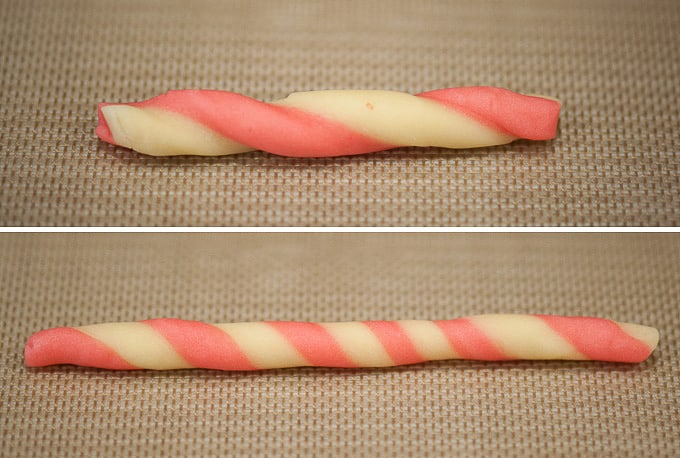
Cut thin strips, roll them into ropes while gently twisting, then shape into candy canes.
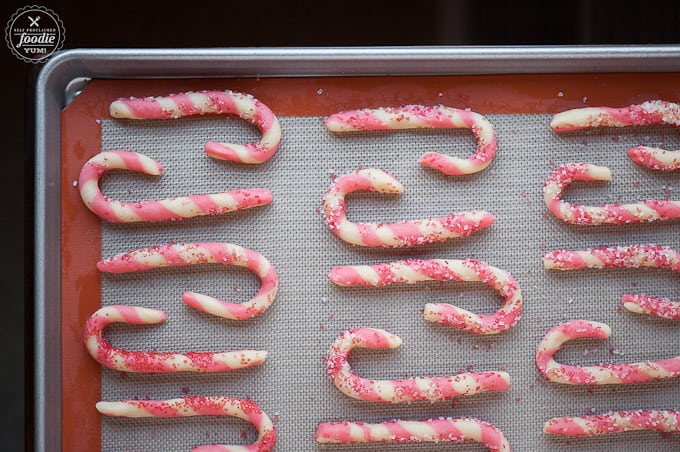
Roll each candy cane in coarse sugar for that signature sparkle.
Learn from me: Keep the dough cold while working. If it starts to get too soft, pop it back in the fridge. Chilled dough means cleaner shapes and less spreading in the oven.
4. Bake and Cool
Bake at 325°F just until the bottoms are slightly golden, about 13–15 minutes. Cool on the sheet for a few minutes before transferring to a wire rack.
5. Store Properly
These peppermint cookies will make everything around them smell like peppermint too—so store them separately from other cookies in an airtight container.
Tips for Success
- Keep the dough cold. If the dough warms up too much, your candy canes can lose their shape when baking.
- Use coarse decorating sugar. It sticks better and gives a gorgeous sparkle without melting during baking.
- Space cookies apart. They do spread a little, so give them breathing room on the baking sheet.
- Rotate your baking sheets. This helps get an even bake, especially if your oven tends to have hot spots.
Frequently Asked Questions
Since these require a bit more work that other cookie recipes, I tend to get a few more questions. Hopefully these will help.
Yes! Shape the candy canes, then freeze on a baking sheet before transferring to a freezer-safe container. Bake straight from frozen, adding a minute or two to the bake time.
This recipe is meant for hand-twisted candy canes, but you could absolutely roll the dough out and use a cutter if you prefer!
If the dough gets too warm before baking, the cookies will spread more. Always chill shaped cookies before baking for the best results.
Definitely. These cookies stay fresh for about a week in an airtight container, and you can freeze baked cookies too.
Pin this now to save it for later
Pin ItPeppermint Candy Cane Cookies

Ingredients
- 2 1/4 cups all purpose flour
- 1/2 teaspoon kosher salt
- 1 cup unsalted butter room temperature (2 sticks)
- 3/4 cup granulated sugar
- 1/2 cup powdered sugar
- 2 large egg yolks
- 2 teaspoons peppermint extract
- 1 teaspoon vanilla extract
- 12 drops red food coloring
- 1/2 cup decorating sugar red, white, your choice but large crystals work best
Instructions
- In a small bowl, combine 2 1/4 cups all purpose flour and 1/2 teaspoon kosher salt. Set aside.
- In a stand mixer with the paddle attachment, beat the 1 cup unsalted butter on high speed until light and fluffy, about 4-5 minutes. Scrape the sides, add the 3/4 cup granulated sugar and 1/2 cup powdered sugar and continue to beat until very light in color and fluffy, another 2-3 minutes. Scrape sides again and add the 2 large egg yolks, 2 teaspoons peppermint extract, and 1 teaspoon vanilla extract, beat on low speed until well combined.
- With the mixer running on low speed, spoon in the flour and salt mixture until all of the dry ingredients have been added and fully combine. Do not over mix.
- At this point, remove half of the dough and place on a sheet of plastic wrap. If you're a perfectionist, you should have about 28 ounces total, so you'd want to take out about 14 ounces of the dough. Add 12 drops red food coloring to remaining dough in bowl and mix just until the color has evenly blended in. Add the red dough to a separate piece of plastic wrap.
- Shape both dough balls into a square that’s about 5-6 inches in length. Wrap tightly in plastic wrap and refrigerate 2 hours or overnight (or longer if you’re making them ahead of time).
- Preheat oven to 325 degrees F and prepare two baking sheets with parchment paper or a silpat.
- Roll each dough to a 9×9 inch square, then stack them on one another and roll to seal them together. Cut the dough down the center and refrigerate both halves. After the dough has chilled a bit, after maybe 15 minutes, take out one of the halves and start cutting short strips that are about 1/4 inch thick. Roll each strip to lengthen and slightly twist at the same time. Roll in 1/2 cup decorating sugar sugar and then lay out on baking sheet in the shape of a candy cane. Refrigerate or freeze the baking sheet until the dough is cold again prior to baking (this will help prevent them from spreading while they bake).
- Bake until just slightly brown on the bottoms, 13 to 15 minutes. Rotate your baking sheet half way though if your oven doesn’t bake evenly. Remove from oven and allow to cool on sheets for 5 minutes before transferring to cooling rack. Continue baking process with remaining dough, keeping it cool until ready to bake (otherwise your cookies expand too much).
- Store in airtight container and segregate from other cookies as the peppermint flavor will transfer.
Nutrition
Nutrition information is automatically calculated, so should only be used as an approximation.






Very disappointed that I gave this recipe a try, even after all the bad reviews. The cookies expanded so much, they didn’t even look like candy canes anymore, the dough was so sticky, which made it very hard to work with, and they crumbled as soon as I tried to pick them up to eat one. Should have found a different recipe.
I’m sorry to hear that! I’m not sure why they didn’t work for you. I find that the colder the dough, the less they spread. Also, whenever I’m baking, if the dough seems too sticky I’ll always add enough flour to make them easy to handle. They worked for me… sorry they didn’t work for you!
They spread because of all the butter. I make mine with 1/2 shortening and 1/2 butter and once they really shaped I chill them in the fridge and bake them cold. They keep their shape much better, Then I “paint” on a thin layer of Karo light corn syrup and sprinkle with crushed candy cane candy. Been making them that way for over 40 years. Good luck Maria.
My cookies did not look anything like yours. Don’t know what I did. Maybe I’ll try next Christmas. Boo hoo.
Sorry to hear that, Chris. Was the dough really cold? Even room temp dough will spread out into ugly cookies.
Wow…..followed directions exactly. My cookies totally spread all over. So disappointed as they are so time consuming. Kept dough chilled, kept rolled cookies in fridge until ready to bake, but still spread. Don’t know what went wrong.
I’m sorry to hear that, Sharon! The only recommendation I can think of is to chill them again after rolling. The colder the dough, the more they will hold their shape. We keep our house pretty cold… maybe that’s why mine didn’t spread? Krissy
Ce chakra est basé sur la conscience physique et sur le fait de se sentir à l’aise dans de
nombreuses situations.
These taste really good, but I could not get them to roll and stay together, and certainly not twist and stay together, and definetly not curve into a cane and stay together. The dough was sticky and slimy, even though I had it in the fridge overnight and cut, rolled, twisted very quickly. I ended up with white and pink sort of twisted peppermint cookies that spread out like crazy when baking.
Hi Melissa, Was the dough cold when you tried to shape it and bake it? I know that if I let it sit out too long that it will really expand in the oven and the way to make it hold its shape while cooking is to cook cold dough vs room temp. I’ve made these cookies 3-4 times and they’ve always turned out, even thought the rolling/twisting process can take some patience. Are you sure you followed the recipe exactly? -Krissy
These baked into a beautiful and lovely cookie. It may have been my peppermint extract, but using the amount in the recipe was too much for me. But it was nothing a little chocolate couldn’t fix. I dipped the bottoms in chocolate and it was a great combo. Thanks for the super cute cookie idea. My family will gobble them up next week for Christmas!
Oh my! I never thought about how good these would be dipped in chocolate. YUM!
What am I doing wrong. The dough is crumbly and the candy canes are breaking apart.
Hmmm… I’m trying to think what may have happened. Did you really cream the butter well? If you did, that’s a good thing. After you cut the strips, were they exposed to air for a long time? I’ve always cut and twisted reasonably quick. I’ve had mine crack just a bit but that’s usually only if I cut too many strips and they sit out exposed to the air while I’m waiting to get them in the oven. -Krissy
Hands down these are the best Christmas inspired cookies I have seen on the web lately. They look so cute and I bet they taste delicious too – pinned!
These candy cane cookies are so perfectly done and pretty!
I wish I had read the comments first. The dough was fine but even after chilling the dough 30 mins after shaping it spread across the whole pan. 2 batches wasted. Shaped the rest and will chill overnight and bake right out the fridge. I hope it helps.
Sorry that happened! I’ll update the recipe with those recommendations.
Hi Krissy, These look really good. I can’t wait to try making these with my daughter. She’s been baking with me for a few years now and loves it. We have our favorites but, I think this would be a great addition. Pinned for later.