This post may contain affiliate links. Please read our disclosure policy.


Perfect Chicken Parmesan is full of flavor, takes minutes to cook, and is my favorite chicken dinner recipe!
Boneless skinless chicken breasts are tenderized, lightly breaded, and cooked to crispy perfection. Once they are smothered in your favorite marinara sauce and melted cheese, the most delicious dinner is ready for your consumption!

Why this recipe works:
Any recipe that coats chicken in a wonderful crispy outside like my chicken tenders or buttermilk fried chicken is a winner in my book. And the fact that this is such an easy recipe will have you making it on a weekly basis.
Because the chicken breasts are tenderized before cooking, no knife is required. This recipe is made extra easy by using bottled pasta sauce and you can even use pre-shredded cheese.
Chicken parm is possibly my favorite dinner… especially when served with homemade pasta! If you’re wanting a vegetarian version, you can’t go wrong with eggplant parmesan! Also, if you enjoy this recipe, you’ll want to make my Chicken Cacciatore.
Here’s how to make it:
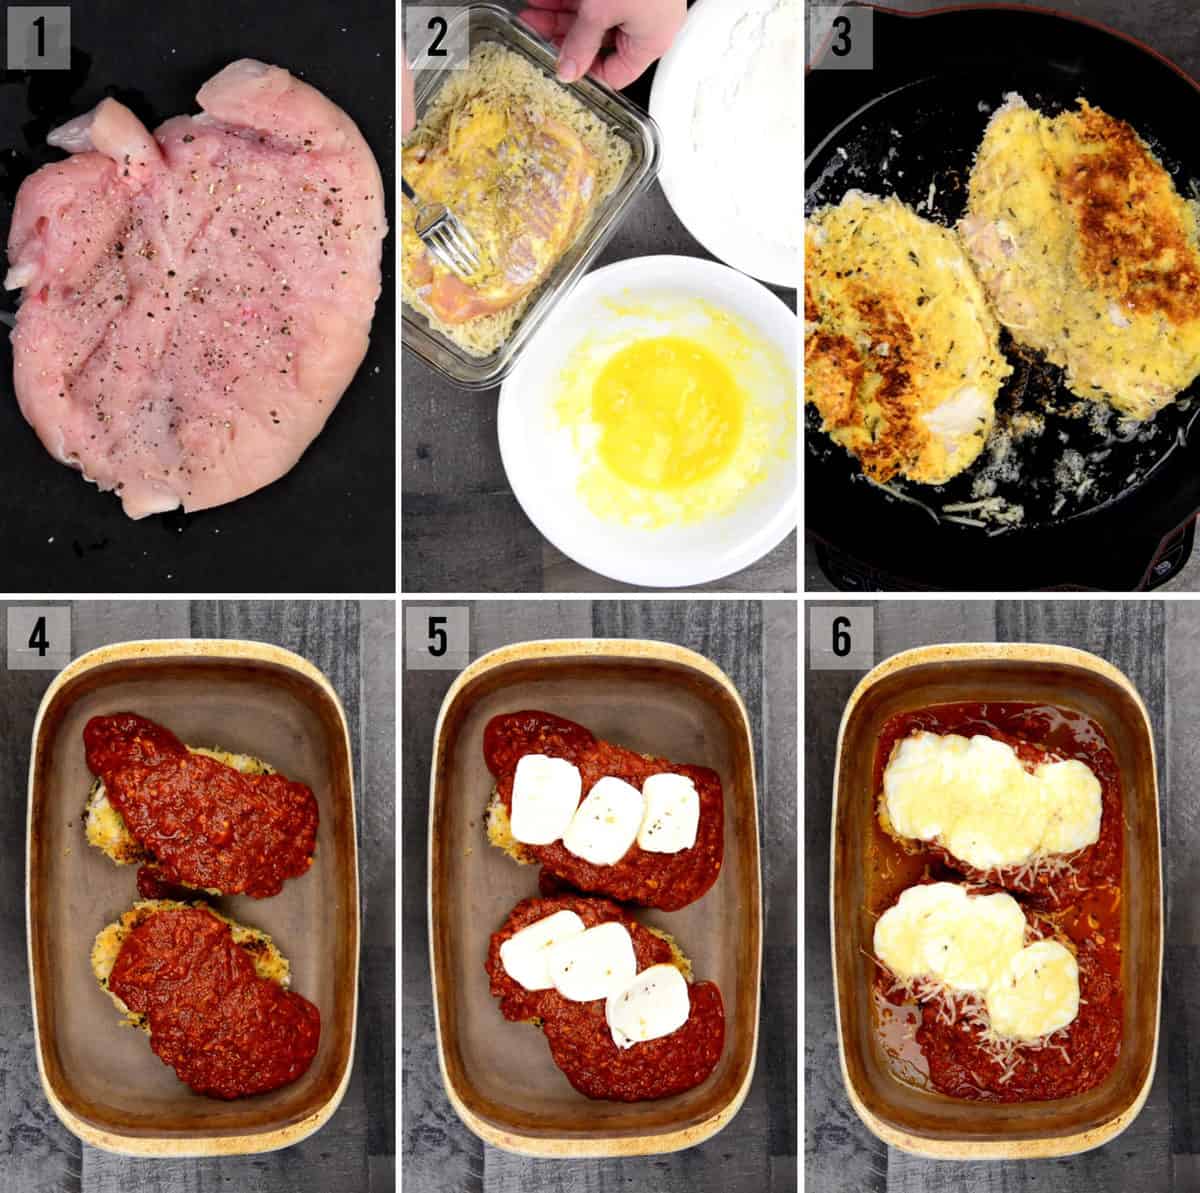
- First step is to tenderize the chicken (more information on why that is important below) and season with salt and pepper (photo 1).
- The crumb coating I use when making this easy chicken parmesan is a 2:1 mixture of bread crumbs to parmesan cheese plus some herbs. Dredge the chicken in the flour, then coat with egg, then coat with the bread crumb mixture (photo 2).
- Brown the chicken on both sides in olive oil (photo 3).
- To finish off your chicken parm, all you need to do is top those crispy seasoned chicken breasts with a healthy portion of amazing tomato pasta sauce (photo 4) and then top that with some slices of fresh mozzarella (photo 5) along with some grated parmesan. Finish the whole thing off in the oven to get the cheese all nice and melted (photo 6).
Why tenderizing is important:
You want your chicken breasts to be thin for several reasons:
- First, when you pound the meat with a mallet or roll it with a rolling pin, you break up the tissue and it makes it more tender. So much so that you can easily cut it with the side of your fork. I prefer to pound my meat over rolling it because its fun.
- Second, you want your chicken to be of uniform thickness so that it cooks evenly.
- And third, the thinner the meat, the faster it cooks. During school and sports season, we all need meals that can be cooked quickly.
Cooking tips:
- I always choose to put my crumb mixture in a rectangular dish that’s the exact size of the chicken breast. It makes coating the chicken easy.
- If you’re wondering how do you keep chicken parmesan crispy, you must cook the coated breasts in very hot oil in a single layer. This will give them a crispy golden outside and won’t leave them soggy.
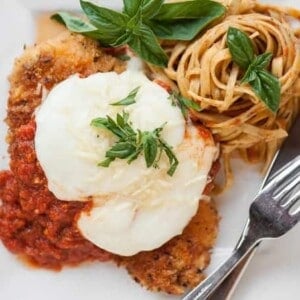
- I served my parmesan chicken up with some basil pasta that I tossed in some of the reserved pasta sauce.

Did you make this recipe? Please leave me a comment below to let me know what you think!
Pin this now to save it for later
Pin ItChicken Parmesan Recipe
Ingredients
- 1 pound boneless chicken breasts skinless
- salt & pepper
- 1/2 cup all purpose flour
- 1 egg beaten
- 1 cup panko bread crumbs
- 1/2 cup grated parmesan cheese divided
- 1 teaspoon dried basil
- 1 teaspoon dried oregano
- 1/4 cup olive oil
- 25 ounces pasta sauce Rao's is my favorite
- 8 ounces fresh mozzarella sliced
Instructions
- Preheat oven to 400°F.
- Using a large plastic bag or plastic wrap, cover 1 pound boneless chicken breasts and flatten to half inch thickness using a meat pounder or a rolling pin.
- Sprinkle salt & pepper on both sides of chicken.
- Add 1/2 cup all purpose flour to bowl. Beat 1 egg into another bowl. Combine 1 cup panko bread crumbs with half of the 1/2 cup grated parmesan cheese (reserving the other half for later) along with the 1 teaspoon dried basil and 1 teaspoon dried oregano in a dish large enough for the chicken breasts.
- Heat 1/4 cup olive oil in a very large skillet over medium high heat.
- Dredge chicken in flour, then coat with egg, then cover with bread crumb mixture. Press coating onto chicken to get as much as possible to stick. When the oil is very hot, just below the point where it begins to smoke, add your coated chicken. Continue with the remaining chicken breasts.
- Cook each breast until golden brown, about 2 minutes on each side. Remove from pan and transfer to baking dish. Any remaining oil can be strained and refrigerated for future use, if desired.
- Cover the cooked chicken breasts with 25 ounces pasta sauce as well as a couple slices of 8 ounces fresh mozzarella and the remaining 1/2 cup grated parmesan cheese. You may reserve some of the sauce to serve with pasta on the side, if desired.
- Cook in preheated oven until cheese has melted, about 5-10 minutes.
Notes
- I used a combination of olive oil with avocado oil because it tolerates high temperatures better
- I always choose to put my crumb mixture in a rectangular dish that’s the exact size of the chicken breast. It makes coating the chicken oh-so-easy. The crumb coating I use when making this easy chicken parmesan is a 2:1 mixture of bread crumbs to parmesan cheese plus some herbs like fresh basil.
- If you’re wondering how do you keep chicken parmesan crispy, you must cook the coated breasts in very hot oil in a single layer. This will give them a crispy golden outside and won’t leave them soggy.
Video
Nutrition
Nutrition information is automatically calculated, so should only be used as an approximation.
This post was originally created in September 2015 and has been updated with additional photos, cooking tips, and helpful information. Don’t worry – I didn’t change the recipe!


This was delicious! I used a hot cast iron skillet to fry it in before putting in oven and it it turned out amazing . Will be pulling this recipe out for future dinner guests….thanks for sharing!
Made this tonight for my family. Everyone loved it!! Very easy to make. The only thing different I did was to do 1/2 cup panko and 1/2 cup Italian bread crumbs. Will definitely be making again soon when my daughter comes home from college!!! Thanks!!
Followed the recipe exactly, even used the same sauce and it came out perfect!
The chicken was very moist. By putting it in the oven for only 5 mins isn’t really enough to dry out the chicken. I will definitely make this again.
I pounded my chicken breast and cooked each one 1 minute a side for a total of 2 minutes. They were still not cooked in the oven after 10 minutes. I had to keep mine in the oven longer. Did you use chicken tenders instead or cook them longer on the stove top before placing them in the oven?
I pound mine really thin. Perhaps that’s the difference? Cook times are always approximate, though, because of how ovens and cookware differ… Hope it still worked for you! Krissy
I also Cooked the chicken longer than in the recipe and mine was raw! Very disappointing. But i put it back in the oven 10 minutes longer
Sorry to hear that! With meat, cooking times always vary based on the temperature of how your oven cooks, the thickness of the meat, and how cold the chicken was prior to cooking. I hope that it still tasted great even though it took longer to cook!
This is about the same way I make chicken parm, and the Mezzetta sauce is the best of jarred sauces in the market. I use the marinara. Sure, always best to make your own but not always convenient.
Agreed!!! Thanks, Marsha! -Krissy
Its very difficult to see the consistency of the sauce.. Is it as thick as it looks in the pictures?? Was thinking about trying the sauce but also debating making my own.. Very unsure.. Hmm
Hi Shanna, I actually highly recommend that sauce. Homemade is always best, but that particular sauce is fantastic! -Krissy
Looks great! Where can I find this jar of sauce please?
Hi Kat! I got it at Fred Meyer, which is a Kroger store. -Krissy
I cooked this for my family tonight. The chicken was tender and juicy. It never dried out. Wonderful flavor!!!!
I will definitely be trying this one, thank you, although I will make the sauce from scratch and maybe pop under a very hot grill rather than in the oven. Thank you so much. Have you tried Rice Bran Oil? Fabulous for really high heats (up to 250C) and does not change taste or appearance, makes great dressing as well. I use a brand called Alpha One (in the UK)
I’ve never even heard of Rice Bran Oil. Interesting! -Krissy
It seems a pity to do such a nice job with the chicken and then pour sauce right out of the jar onto the food. Find a nice tomato basil that you like and saute the garlic and onions and it will be infinitely better. Once onions (or anything else) sits in sauce for a few months you lose a lot of the point of using them.
You emphasize “quickness”. Baking chicken after frying it dries it out. Just drop the sauce on the chicken, put on your cheese and put a cover on the frying pan. The steam from the sauce will melt the cheese in 15 seconds. The oven is wholly unnecessary.
Excellent tips, Dennis. Thanks for sharing! Krissy
If you didn’t like the recipe, write your own. Sounds yummy too me.
Sounds like a wonderful dish. I will definitely try.
If you cover the chicken well so that the steam is trapped inside, it doesn’t dry out the chicken.
I wouldn’t do it in a covered frying pan to melt the cheese if you want your chicken cutlets to be crispy…in the oven to keep it crisp is a better alternative IMO